There’s rather more to publicity than simply correcting for mild. It’s one of the vital highly effective instruments you need to use creatively.
In a previous article, I mentioned how the digital camera information the quantity of sunshine in a scene after which units the publicity accordingly. I used my analogy, likening the digital camera’s sensor to a tray stuffed with glasses. You maintain that tray underneath a bathe for a set size of time, and whereas a number of the glasses will fill to the highest, others will half fill. In the meantime, some areas obtain no water in any respect, and the glasses stay empty. Nevertheless, on common, they’re half full.
Equally, your digital camera’s sensor is roofed in receptors (referred to as photosites). You possibly can think about that these will fill with mild comparable to the areas of differing brightness within the scene. The place there may be lots of mild, the photosites fill to the highest. Others could not get any mild in any respect and be empty. Nevertheless, most will sit someplace in between. The complete photosites document the white areas of the image, the empty ones document black, and the others in between create all of the tones, from shadows via mid-tones to highlights. Nonetheless, on common, they are going to be half full of sunshine.
That, after all, is a massively simplified and never fully correct description of what’s taking place, however it’s a helpful means of understanding publicity.

The Significance of the Histogram
In your digital camera and in enhancing software program, a histogram is a sort of bar graph used to symbolize the distribution of sunshine within the image. Utilizing my analogy, the extra photosites which can be stuffed with mild at a given brightness, the upper the height.

On the left is black and on the precise is white. Between these extremes lie the shadows, midtones, and highlights.
On a DSLR, that you must take a look at the photograph you’ve gotten simply taken to view the histogram, or use Reside View. Nevertheless, mirrorless cameras are superior as a result of you possibly can normally swap the histogram on, permitting you to view it dwell. You will want to look on-line to your digital camera mannequin and directions on the right way to allow the histogram. Nevertheless, it’s important to notice that digital camera shows will not be calibrated. Subsequently, a scene could seem brighter or darker than when seen on a calibrated pc display. Nevertheless, when inspecting the histogram, you possibly can decide if the highlights are blown out or too darkish, so it is a wonderful information to getting the publicity proper.
Pictures and their Histograms
A Black to White Gradient
The histogram is obtainable in most growth and enhancing software program. Here’s a screenshot of Lightroom exhibiting a gradient from black within the prime left, via ever-brightening shades of grey, to white. The histogram represents the variety of pixels at every brightness. There are fewer darkish and lightweight pixels on both finish of the histogram, as seen within the prime left and backside proper of the picture. The image primarily consists of a variety of midtones.

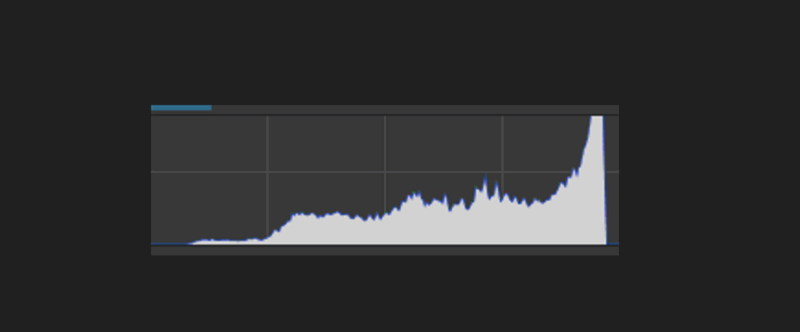
A Excessive Key {Photograph}
Word how the next high-key (brilliant) image, taken within the fog, has no blacks and only a few darker tones. This may be seen on the left-hand facet of the histogram, the place there are only a few pixels. The posts and their reflections are mid-tones, seen on both facet of the middle line of the histogram. Nevertheless, notice the numerous variety of highlights within the scene and the corresponding peak on the precise. This histogram is a screenshot from DxO Photolab 8.

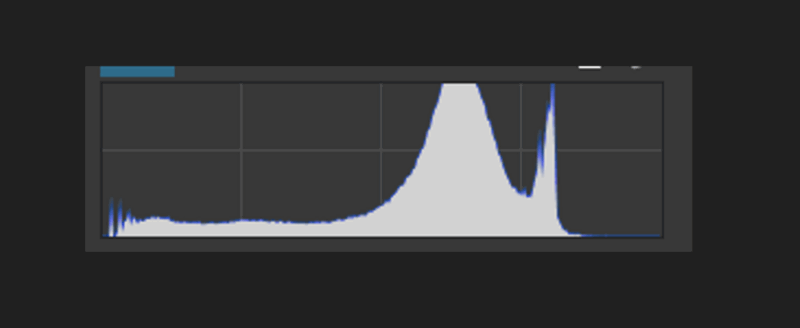
A Low-Key Image
Now take a look at the histogram of a darker scene. The histogram is pushed to the left as a result of there are numerous pixels within the blacks and shadows, and much fewer within the mid-tones and highlights.


A Wider Tonal Vary {Photograph}
On this image, you possibly can see that there’s a comparatively small space of black and shadows on the canine. That is mirrored within the left-hand facet of the histogram, the place there may be a good unfold of darker tones. The solar can be shining on the canine’s coat, and people areas seem brighter, nearer to mid-gray. The massive space of inexperienced grass seems brighter, which is represented by the excessive peak, to the precise of centre on the histogram. The water within the background is brighter nonetheless, although it has a extra even tone, and the ultimate slim peak on the precise represents that.

Your Digital camera Can Idiot You
Typically, the world is usually midway between white and black; we name this mid grey. The next photograph is of a grey card. You’ll have to take my phrase for this: the digital camera has reproduced it on the similar brightness as it’s in actual life.
However what if the scene you might be capturing is just not mid-gray? What if, as an alternative, it’s largely white, like a winter scene? Your digital camera will nonetheless count on the world to be mid-gray and can cut back the publicity accordingly. Consequently, that white turns into grey. That’s in all probability not what you need.
Attempt it. Discover a piece of white paper. Subsequent, draw a small X within the center so your digital camera has one thing to concentrate on. Now zoom in on the paper so it fills the body. Take the photograph and take a look at the histogram. The image received’t be white as you may count on, however grey. As an alternative of the histogram being pushed to the precise, it’s within the center.

To realize an accurate brightness, that you must improve the publicity. This course of is named Publicity Compensation.
Our cameras Are Not All The Identical
I’m assuming you might be capturing in aperture precedence mode, as I recommended in a earlier article. All publicity compensation does is change the shutter pace to let in roughly mild.
The publicity compensation adjustment varies from digital camera to digital camera. You’ll have a +/- button that you should press first. You then flip the primary management (command) dial on the digital camera’s again to extend the publicity. Examine the digital camera’s show to see this taking place. Growing the publicity ends in a optimistic worth, whereas lowering it offers a damaging worth.
On cameras with two management dials, one could also be arrange to do that with no need to press a button. In the meantime, just a few cameras have a dual-function dial the place you press it in to alter the operate from adjusting the aperture to making use of publicity compensation. A web based seek for “Publicity compensation (your digital camera mannequin right here)” will rapidly present you the way it works in your particular digital camera mannequin. If you haven’t bought a camera yet, then do contemplate getting one with two management dials; it makes capturing a lot less complicated.

So, if you’re photographing a white horse in a snowstorm, you should improve the publicity. Take a photograph of that paper once more, however this time modify the publicity worth (EV) to +1. The identical applies when capturing on a seaside with white sand, within the fog, or every other situation the place the scene is brilliant.
Photographing a Black Cat on a Coal Pile
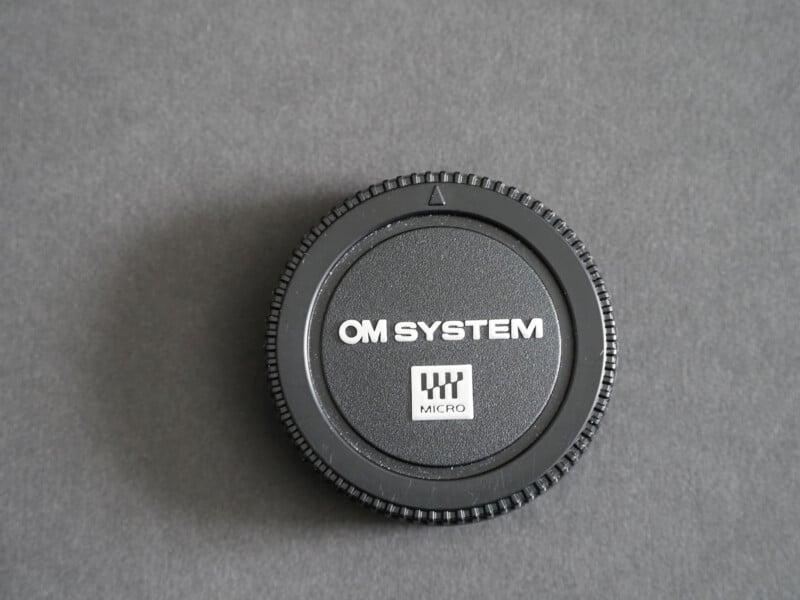
The reverse is true if you’re photographing, say, a black cat sitting on a pile of coal. For instance, contemplate the next image of a digital camera physique cap sitting on a black card. With out compensation, the topic doesn’t seem black however grey. Subsequently, to appropriate the publicity, I need to add damaging publicity compensation.
Give {that a} go too. First, reset your digital camera to zero publicity compensation. Now discover one thing black to {photograph}. Fill the body with it, and take a shot. Did it come out grey? This time, add -1 EV to darken it down once more.
Publicity Compensation is Artistic Energy
One other necessary facet of publicity compensation is its inventive use. By intentionally lowering or growing the publicity, you possibly can emphasise the distinction between darkish and lightweight areas.
On this first picture, it was a stormy day, and the water was darkish blue. The eider was lit from behind me by the low however subtle autumnal solar. I diminished the publicity to -2 EV. That darkened down the water and prevented the highlights of the duck from being blown out. It was shot at ISO 200. With a 400mm lens at f/4.5 and a shutter pace of 1/3200.

Within the following picture, the night solar was hidden behind the clouds, however the brilliant sky was illuminating the river. By lowering publicity within the digital camera to -1.3 EV, I used to be in a position to make the river stand out in opposition to the darker panorama. This was additional exaggerated in growth software program.

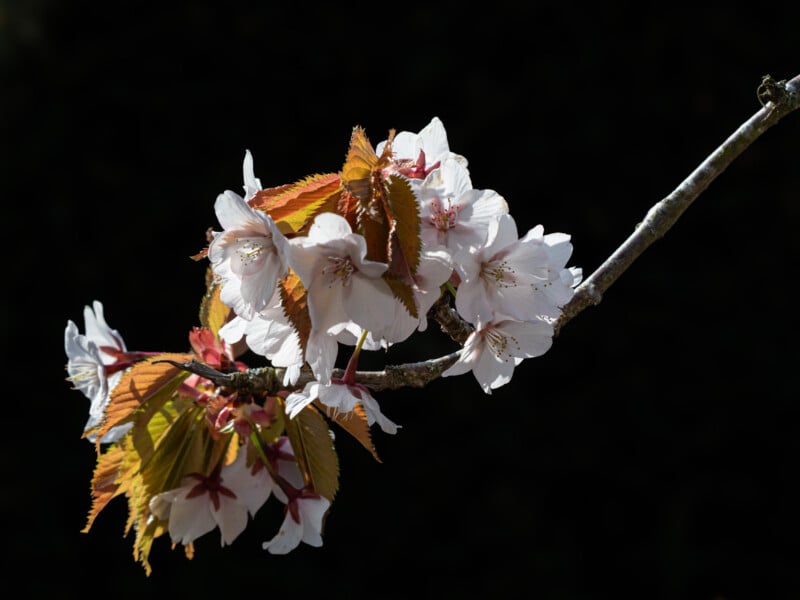
Equally, this blossom was brightly lit by the sunshine whereas the background was darker. Decreasing the publicity by – 0.7 EV darkened the background additional and prevented the whites from blowing out.
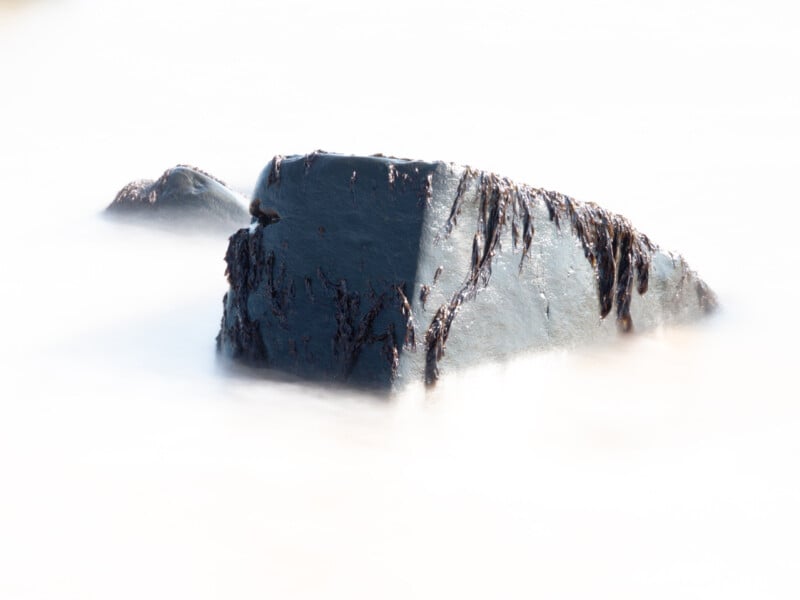
In the meantime, including +2.3 EV to the next picture gave his lengthy publicity a wierd, otherworldly really feel.
In Conclusion
It’s price experimenting with publicity compensation, each to appropriate the lighting to extra intently resemble the world as you skilled it and to make use of it artistically.
Take into account how brilliant the scene is in comparison with mid-gray, and whether or not your digital camera is over- or underexposing the shot. Additionally, search for scenes the place the distinction between mild and darkish is already robust and contemplate how one can modify the brightness or darkness of the photograph to make the topic stand out in opposition to its background.
Lastly, be taught to make use of the histogram. It’s a useful gizmo that may enable you to acquire a greater understanding of publicity.